

Persistent Volumes:
Kubernetes Persistent Volumes (PVs) are a way to provide durable storage to your applications. A PV is a piece of storage in the cluster that has been provisioned by an administrator or dynamically provisioned by Kubernetes itself.
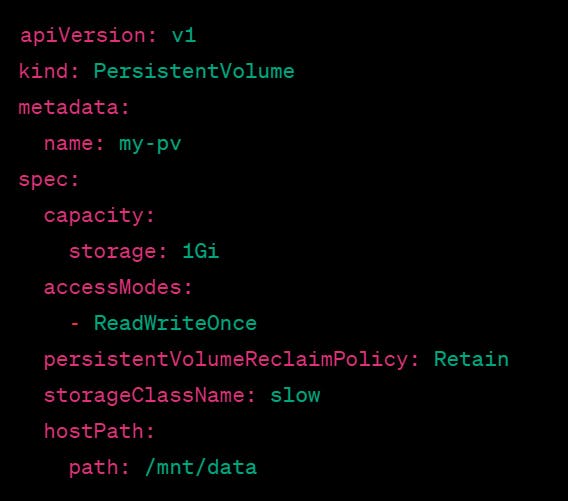
In this example, we define a Persistent Volume with the name my-pv and a storage capacity of 1 gigabyte. It has one access mode: ReadWriteOnce, meaning it can be mounted as read-write by a single node in the cluster at a time.
The persistentVolumeReclaimPolicy is set to Retain, which means that when the Persistent Volume is released, its data will not be automatically deleted, and the administrator will have to manually delete the data.
The storageClassName is set to slow, which is used to match this PV to a corresponding Persistent Volume Claim (PVC) that requests storage with the same class.
Finally, the hostPath is set to /mnt/data, which is the location on the host where the Persistent Volume will be mounted. Note that this is not a network file system, and the data on this path is specific to the node on which the volume is mounted.
Persistent Volume Claim:
In Kubernetes, a Persistent Volume Claim (PVC) is a request for a specific amount of storage that is bound to a Persistent Volume (PV).
Let's say you have a WordPress application running on Kubernetes, and you want to store the uploaded media files to a persistent storage so that they are not lost when the container restarts or migrates to another node.
To achieve this, you can define a PersistentVolumeClaim (PVC) in your Kubernetes deployment file, which is like a request for storage. Here's an example PVC:
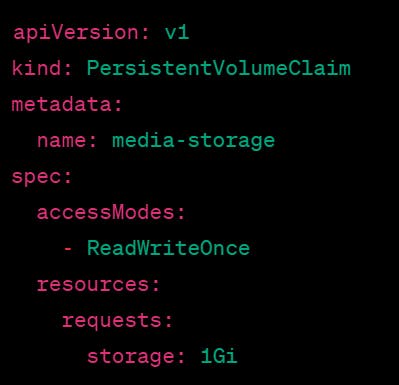
This PVC is requesting a 1GB storage with "ReadWriteOnce" access mode, which means it can be mounted as read-write by a single node. Once the PVC is created, Kubernetes will try to find a matching PV to satisfy the request. If it can't find an available PV, it will dynamically provision one for you, based on the storage class defined in the PVC.
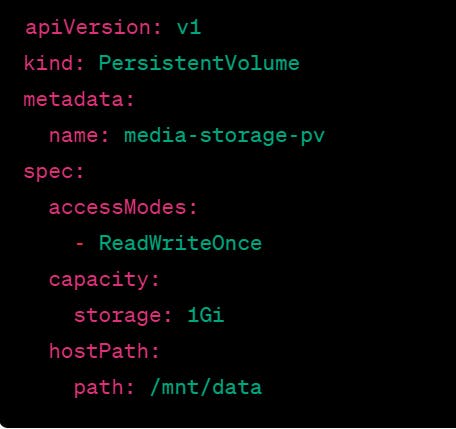
This PV is using the "hostPath" storage type, which means the storage is on the local node's file system. Once the PV is created, it's bound to the PVC, and Kubernetes will mount the storage to the container's file system.
In our WordPress example, you can define a volume mount in the deployment file to mount the PVC to the WordPress container:
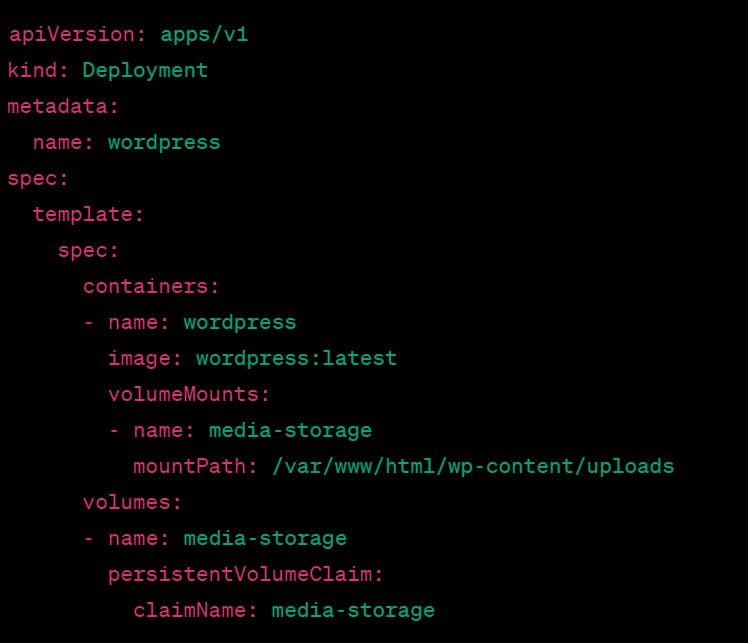
This will mount the PVC to the container's /var/www/html/wp-content/uploads directory, where WordPress stores its media files.
Storage Classes and StatefulSet:
A Storage Class is an object in Kubernetes that describes the type of storage that is available to be dynamically provisioned by a cluster. Storage Classes are used to abstract the underlying storage infrastructure and provide a common set of parameters for requesting storage.
For example, a Storage Class can define the type of storage to use (e.g., block or file), the performance characteristics of the storage (e.g., SSD or HDD), and the location of the storage (e.g., on-premises or in the cloud).
Here's an example Storage Class definition that uses AWS EBS volumes:
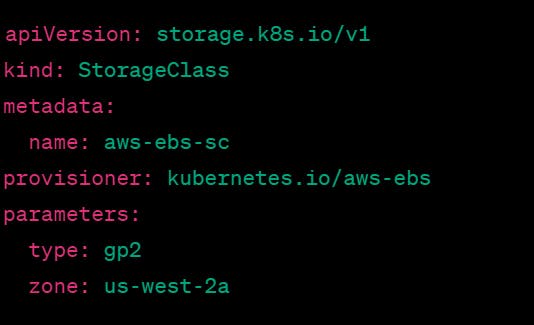
This Storage Class is named aws-ebs-sc and is configured to use AWS EBS volumes with the gp2 type in the us-west-2a availability zone.
StatefulSets:
A StatefulSet is a controller in Kubernetes that manages the deployment and scaling of stateful applications. Unlike a Deployment, a StatefulSet maintains a unique identity for each of its Pods, which allows stateful applications to be deployed with persistent storage.
For example, a StatefulSet can be used to deploy a database cluster where each Pod has its own unique hostname, network identity, and persistent storage. This allows stateful applications to be scaled up or down, and updated or rolled back, without impacting data consistency or availability.
Here's an example StatefulSet definition that uses a Storage Class to provision persistent storage for its Pods:
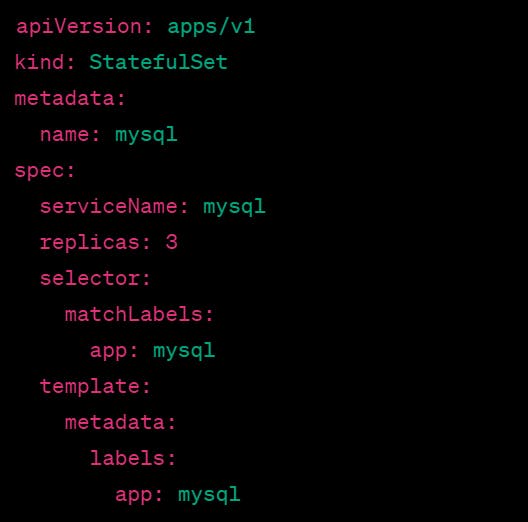
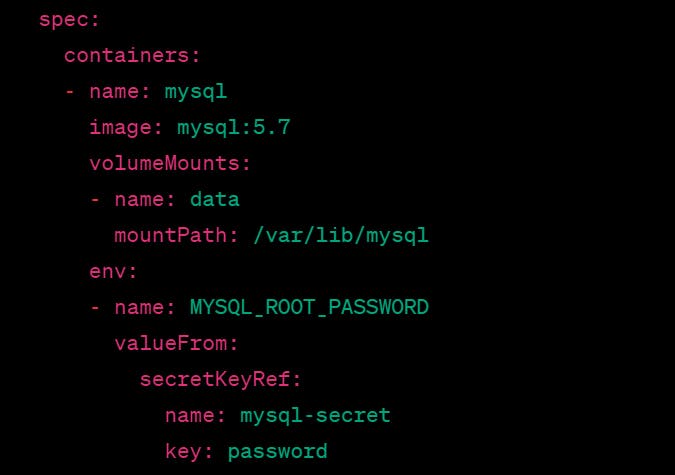
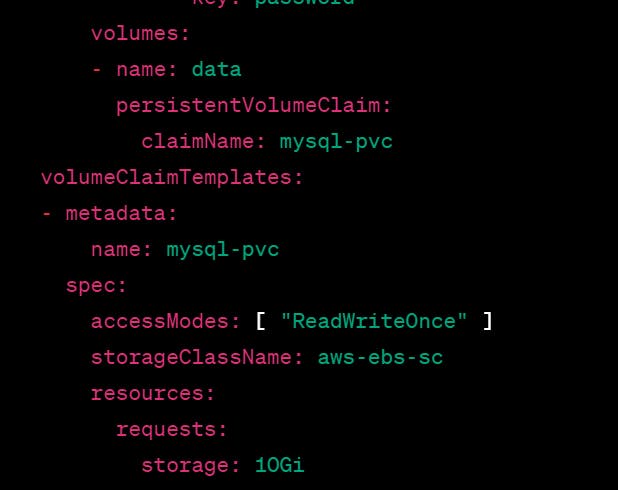
This StatefulSet is named mysql and is configured to deploy 3 replicas of the MySQL database container. Each Pod uses a persistent volume provided by a Storage Class named aws-ebs-sc. The persistent volume is defined in the volumeClaimTemplates section and is requested to have a capacity of 10GB.
RBAC (Role-Based Access Control):
In Kubernetes, RBAC (Role-Based Access Control) is a method of controlling access to resources based on the roles and permissions assigned to users and groups. RBAC is used to define and manage access policies that allow or deny users and groups access to Kubernetes resources.
Here's an example of how RBAC works in Kubernetes:
Let's say you have a Kubernetes cluster with multiple namespaces, and you want to allow a team of developers to deploy and manage applications in a specific namespace called "dev". However, you don't want them to have access to other namespaces or resources in the cluster.
To accomplish this, you can use RBAC to create a set of roles and permissions for the "dev" namespace. You can assign the roles and permissions to the developers, allowing them to deploy and manage resources in the "dev" namespace, but denying access to other namespaces or resources in the cluster.
Here's an example RBAC definition that creates a "dev" namespace with roles and permissions for developers:
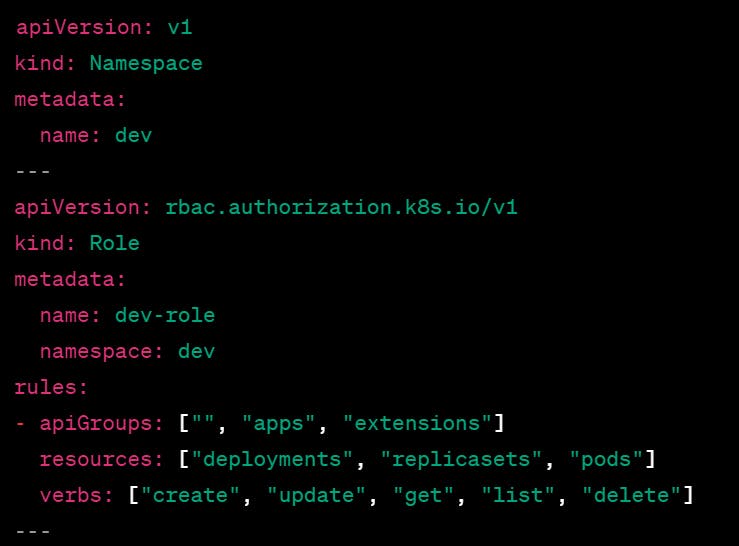
This RBAC definition creates a new "dev" namespace and defines a Role called "dev-role" with permissions to create, update, get, list, and delete resources of type Deployment, ReplicaSet, and Pod in the "dev" namespace.
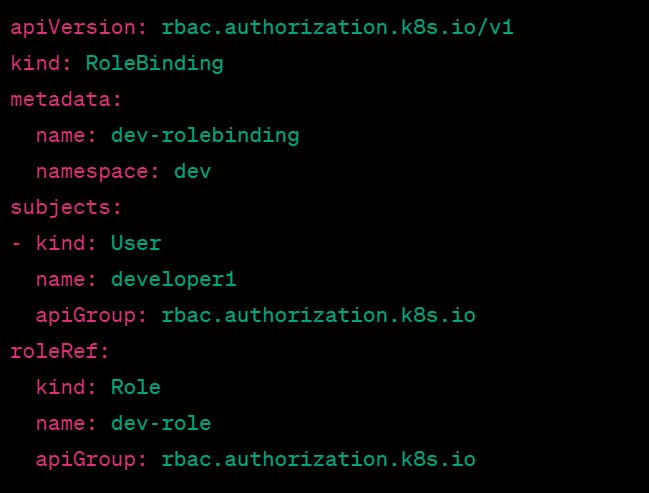
Then, a RoleBinding is created called "dev-rolebinding", which assigns the "dev-role" to a User called "developer1" in the "dev" namespace.
With this RBAC configuration, the user "developer1" can create, update, get, list, and delete Deployments, ReplicaSets, and Pods in the "dev" namespace, but cannot access resources in other namespaces or perform any other actions in the cluster.
In summary, RBAC is an important method of controlling access to Kubernetes resources by assigning roles and permissions to users and groups. RBAC allows you to define access policies that limit access to resources and actions, providing better security and control over your Kubernetes cluster.
Pod Security Policies:
Pod Security Policies (PSP) is a Kubernetes feature that enables cluster administrators to define a set of security policies that pods must adhere to in order to be scheduled and run in the cluster. PSPs help to enforce security best practices by restricting the privileges that pods have and limiting their access to sensitive resources.
For example, a PSP may specify that a pod should not be allowed to run as the root user, or that it should not be able to access the host filesystem. By enforcing these policies, PSPs can help to prevent malicious actors from exploiting vulnerabilities in pods to gain access to sensitive data or compromise the cluster.
Here is an example of how to create a simple Pod Security Policy in Kubernetes:
Here is an example of how to create a simple Pod Security Policy in Kubernetes:
This PSP is named "example-psp" and has the following policies:
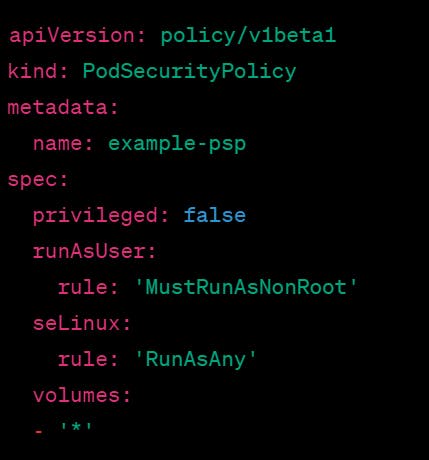
The privileged field is set to false, which means that pods cannot run as privileged containers.
The runAsUser field specifies that pods must run as a non-root user.
The SELinux field specifies that pods can run with any SELinux context.
The volumes field specifies that pods can use any type of volume.
Once this PSP has been created, it can be enforced by creating a PodSecurityPolicy admission controller in Kubernetes. This will prevent any pods from being scheduled that do not meet the requirements specified in the PSP.
Secrets:
In Kubernetes, Secrets are a way to store and manage sensitive data such as passwords, tokens, and other confidential information that applications need to function properly.
Secrets are similar to ConfigMaps, but they are specifically designed to store confidential data. Unlike ConfigMaps, Secrets are encrypted at rest and can only be accessed by authorized users and applications.
Secrets can be used in a variety of ways within Kubernetes, such as:
Providing access credentials to external services, such as databases or APIs.
Storing configuration information that needs to be kept secret, such as TLS certificates or private keys.
Supplying environment variables and other runtime configuration settings to pods.
Here is an example of how to create a Secret in Kubernetes:
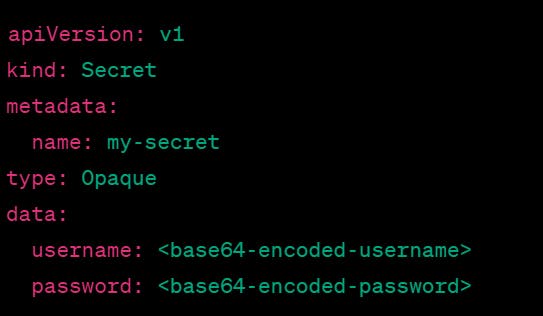
In this example, we are creating a Secret named "my-secret" with two key-value pairs: "username" and "password". The values are base64-encoded to ensure that they are not easily readable. The "type" field specifies the type of Secret, which in this case is "Opaque", indicating that the data is arbitrary bytes.
Once the Secret has been created, it can be mounted as a volume in a pod or used as environment variables. For example:
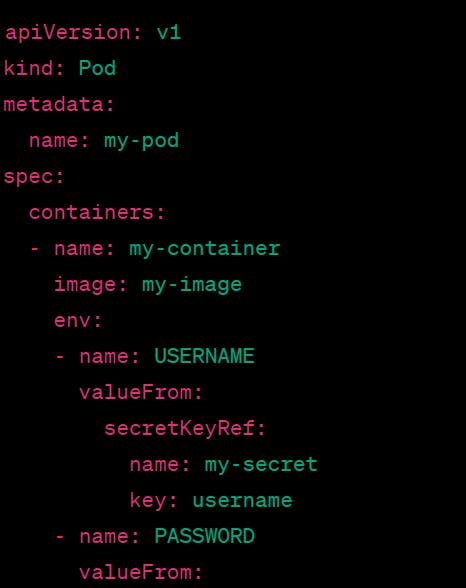
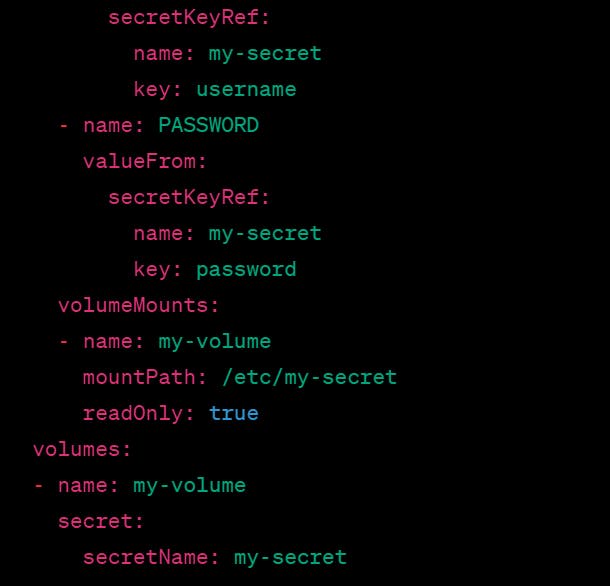
In this example, we are using the "my-secret" Secret to set environment variables for the "USERNAME" and "PASSWORD" fields in the pod's container. We are also mounting the Secret as a read-only volume at "/etc/my-secret". This allows the pod to access the Secret's data as files on the container's file system.
Network Policies:
In Kubernetes, Network Policies are a way to control and restrict network traffic to and from pods within a cluster. Network Policies define a set of rules that govern which pods can communicate with each other and how they can communicate.
Network Policies are often used to increase the security of Kubernetes clusters by limiting access to sensitive services and resources. For example, you might create a Network Policy that restricts access to a database service to only those pods that require it, while blocking access from other pods.
Here is an example of how to create a simple Network Policy in Kubernetes:
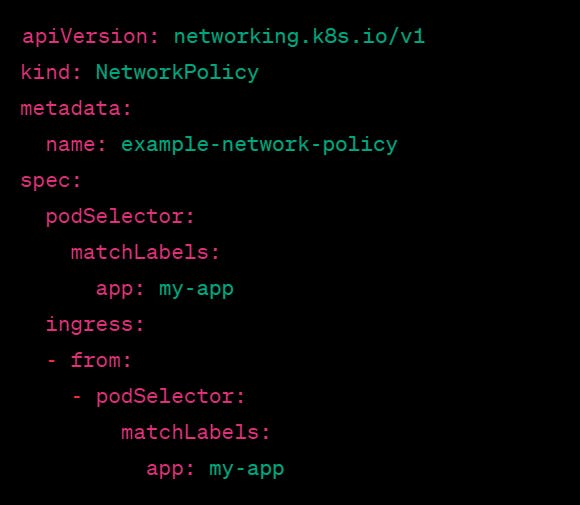
In this example, we are creating a Network Policy named "example-network-policy" that applies to pods with the label "app=my-app". The ingress field specifies that traffic can only come from pods with the same label. This effectively blocks traffic from all other pods.
Once this Network Policy has been created, it can be enforced by creating a NetworkPolicy admission controller in Kubernetes. This will prevent any traffic from being allowed that does not meet the requirements specified in the policy.
Overall, Network Policies provide a powerful tool for controlling and securing network traffic within Kubernetes clusters. By defining rules for how pods can communicate, Network Policies help to ensure that sensitive data and resources are protected from unauthorized access.
TLS (Transport Layer Security):
Transport Layer Security (TLS) is a cryptographic protocol that provides secure communication over a network. In Kubernetes, TLS is often used to secure communication between different components of a cluster, such as between pods or between nodes.
TLS works by encrypting data as it is transmitted over the network, making it much more difficult for attackers to intercept and read sensitive information. TLS also provides mechanisms for verifying the identity of the parties involved in a communication, helping to prevent man-in-the-middle attacks.
Here is an example of how to configure TLS for a Kubernetes service:
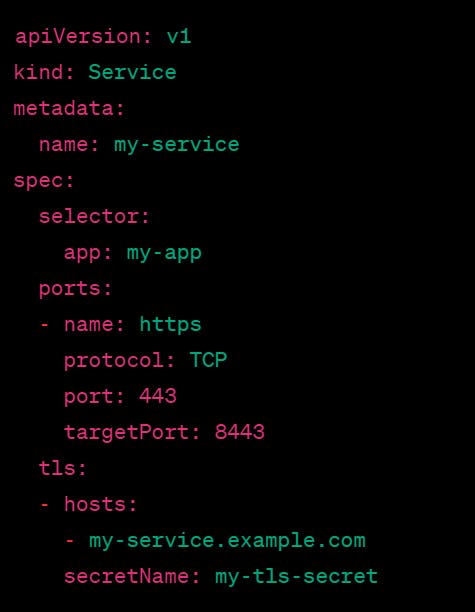
In this example, we are creating a Service named "my-service" with a tls section that specifies the hostname for which the certificate is valid and the name of the Secret that contains the certificate and private key. This Secret should contain the TLS certificate and private key in PEM format.
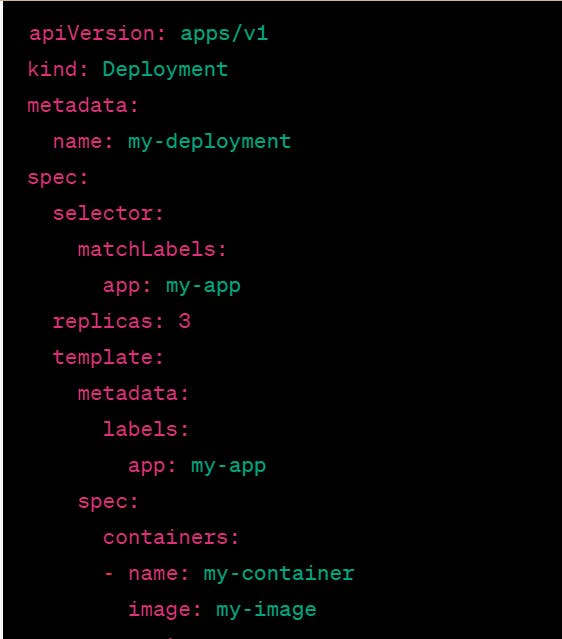
Once the TLS certificate and private key have been added to the Secret, they can be mounted as a volume in a pod or referenced in a deployment's configuration. For example:
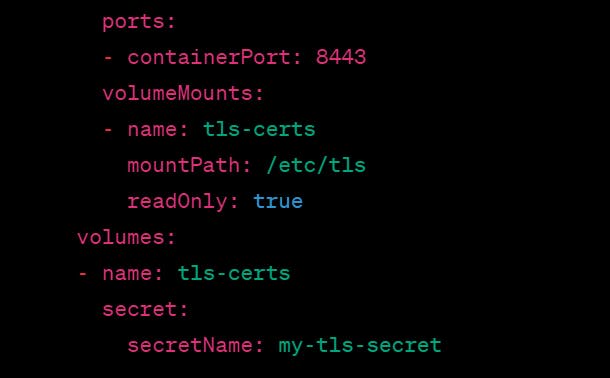
In this example, we are mounting the my-tls-secret Secret as a read-only volume at "/etc/tls" in the pod's container. This allows the container to access the TLS certificate and private key as files on the container's file system.
Overall, TLS provides a powerful way to secure communication within Kubernetes clusters, helping to protect sensitive data and resources from unauthorized access. By configuring TLS for services and deployments, you can ensure that your Kubernetes applications are communicating securely and reliably.
Thank you for reading this blog🙏
I hope it helps 💕
— Safia Khatoon
Happy Learning 😊