why Docker?
Docker is a platform that allows developers to easily create, deploy, and run applications in containers. Containers are a lightweight way to package software and its dependencies into a portable unit that can be easily moved between environments.
A real-world example of how Docker can be used is to simplify the deployment of a web application. Without Docker, deploying a web app can be a complex process involving setting up a server, configuring the operating system, installing dependencies, and deploying the application code. With Docker, this process can be simplified by creating a container that includes all of the necessary dependencies and configuration for the application.
For example, let's say you have a web application that requires Python, Flask, and Redis. With Docker, you can create a Dockerfile that specifies the dependencies and build an image that includes everything needed to run the application. You can then run this image as a container on any system that has Docker installed, without worrying about any of the underlying dependencies or configuration. This makes it much easier to deploy and run the application consistently across different environments.
Overall, Docker provides a way to simplify the deployment and management of applications, making it easier for developers to focus on writing code and delivering value to their users.
what is Docker?
Docker is a tool that helps developers to easily create, deploy, and run applications in containers. Containers are like virtual machines that contain all the necessary software and dependencies needed to run the application.
Advantages of Docker?
In easy and understandable language, Docker has several advantages that make it a popular tool among developers:
Portability: Docker containers can be easily moved between different environments, such as development, testing, and production. This makes it easier to ensure consistency in the application's behavior across different environments.
Efficiency: Docker containers are lightweight and consume fewer resources compared to traditional virtual machines. This means that more containers can be run on a single host, which can lead to cost savings and better resource utilization.
Isolation: Docker containers provide a high level of isolation between different applications running on the same host. This means that if one container fails or is compromised, it does not affect the other containers running on the same host.
Scalability: Docker makes it easy to scale an application horizontally by adding more containers to a cluster. This can help to handle increased traffic or workload without affecting the performance of the application.
Consistency: Docker containers ensure that the application runs consistently across different environments, regardless of the underlying infrastructure. This helps to reduce the chances of bugs and errors due to differences in the environment.
Disadvantages of Docker
There are the following disadvantages of Docker -
In Docker, it is difficult to manage a large number of containers.
Docker is not a good solution for applications that require a rich graphical user interface.
Docker provides cross-platform compatibility means if an application is designed to run in a Docker container on Windows, then it can't run on Linux or vice versa.
Virtual Machine
A virtual machine is software that allows us to install and use other operating systems (Windows, Linux, and Debian) simultaneously on our machine.
The operating system in which virtual machine runs are called virtualized operating systems.

Docker Features
Although Docker provides lots of features, we are listing some major features which are given below.
Easy and Faster Configuration
This is a key feature of docker that helps us to configure the system easier and faster.
We can deploy our code in less time and effort.
Application Isolation
It provides containers that are used to run applications in an isolation environment. Each container is independent of another and allows us to execute any kind of application.
Swarm
It is a clustering and scheduling tool for Docker containers.
Services
Service is a list of tasks that lets us specify the state of the container inside a cluster.
What is Docker's daemon?
Docker daemon runs on the host operating system. It is responsible for running containers to manage docker services. Docker daemon communicates with other daemons.
Docker architecture:
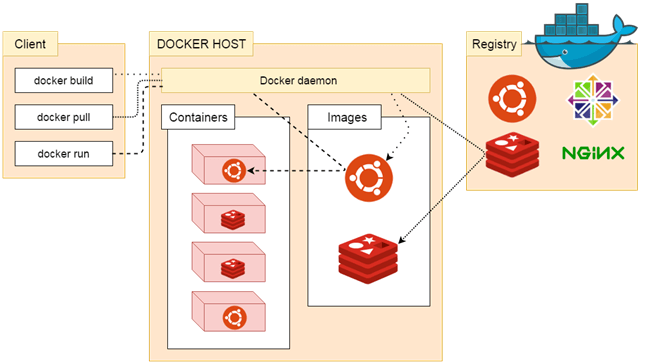
Docker Client
Docker users can interact with the docker daemon through a client.
The Docker client uses commands and rests API to communicate with the docker daemon.
When a client runs any docker command on the docker client terminal, the client terminal sends these docker commands to the Docker daemon
Docker Client uses Command Line Interface (CLI) to run the following commands -
docker build
docker pull
docker run
Docker Host
Docker Host is used to provide an environment to execute and run applications. It contains the docker daemon, images, containers, networks, and storage.
Docker Registry
Docker Registry manages and stores the Docker images.
There are two types of registries in Docker -
Pubic Registry - Public Registry is also called as Docker hub.
Private Registry - It is used to share images within the enterprise.
Docker Images
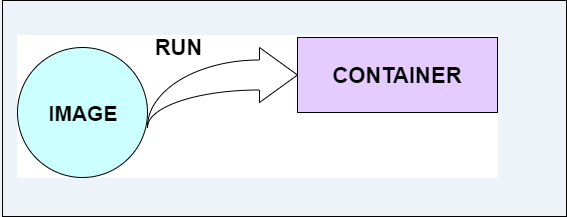
They are executable packages(bundled with application code & dependencies, software packages, etc.) to create containers.
Docker Containers
we can say that the image is a template, and the container is a copy of that template.
What is a DockerFile?
- It is a text file that has all commands which need to be run for build a given image.

In what circumstances will you lose data stored in a container?
The data of a container remains in it until and unless you delete the container.
9. What is a docker image registry?
A Docker image registry, in simple terms, is an area where docker images are stored. Instead of converting the applications to containers every time, a developer can directly use the images stored in the registry.
This image registry can either be public or private and Docker hub is the most popular and famous public registry available.
10. How many Docker components are there?
There are three Docker components - Docker Client, Docker Host, and Docker Registry.
The Docker Client communicates with the Docker Host to build and run Docker containers.
The Docker Host is where the containers are hosted and their associated images are stored.
The Docker Registry is a centralized place where Docker images can be stored, shared, and managed.
Docker Installation:
sudo apt-get update
sudo apt-get install docker.io
How to Give Permissions to Users:
sudo usermod -a -G docker $USER
reboot
How to pull images in docker and how to create containers:
docker pull mysql
How to pull jenkins and expose container port"
docker pull jenkins/jenkins
How to create containers :
docker container run -d --name <your_ctr_name> -p <your_img_name:latest>
note: one image create multiple containers
-d = detached/background/daemon mode
docker ps -shows you running container
docker ps -a - shows you an exited container
How to create Nginx using docker
docker pull image_name
Dockerfile Instructions:
here's an example Dockerfile:
    # Use an official Python runtime as a parent image
    FROM python:3.7-slim

    # Set the working directory to /app
    WORKDIR /app

    # Copy the current directory contents into the container at /app
    COPY . /app

    # Install any needed packages specified in requirements.txt
    RUN pip install --trusted-host pypi.python.org -r requirements.txt

    # Make port 80 available to the world outside this container
    EXPOSE 80

    # Define environment variable
    ENV NAME World

    # Run app.py when the container launches
    CMD ["python", "app.py"]
LABEL: This is used for image organization based on projects, modules, or licensing.
Describe the lifecycle of a Docker Container:
The lifecycle of a Docker container can be described in four stages: creating, starting, stopping, and deleting.
First, a Docker container is created from an image using the
docker createcommand. This sets up the container's file system and other settings.Next, the container is started using the
docker startcommand. This launches the container and executes the command defined in the Docker filesCMDorENTRYPOINTinstruction.While the container is running, it can be interacted with using the
docker execcommand to run additional commands inside the container.To stop a running container, the
docker stopcommand is used. This sends a signal to the container to stop gracefully, allowing it to save any data before shutting down.Finally, a container can be deleted using the
docker rmcommand. This removes the container and its associated data, freeing up resources on the host machine.Overall, the lifecycle of a Docker container involves creating, starting, stopping, and deleting the container as needed.
Difference between CMD and RUN
I can explain the difference between CMD and RUN in Docker.
RUN is used to execute commands while building the Docker image.
When a Docker image is built, every instruction in the Dockerfile is executed in order, and each instruction creates a new layer in the image. RUN instruction is used to execute a command and commit the changes to the image.
CMD, on the other hand, is used to specify the default command to be executed when a container is started from the image. CMD is not executed during the building of the Docker image, but rather when a container is started. The CMD instruction specifies the command to be run along with any arguments. If there is more than one CMD instruction in a Dockerfile, only the last one will be used.
The difference between Build, Run and create
Sure, I can explain the difference between Build, Run, and Create in Docker.
The build is the process of creating a Docker image from a Docker file. A Dockerfile is a text file that contains a set of instructions that are used to build a Docker image. When you run the
docker buildcommand, Docker reads the instructions in the Dockerfile and creates a Docker image.The image is created in layers, with each instruction in the Dockerfile creating a new layer.
The run is the process of starting a container from a Docker image. When you run the
docker runcommand, Docker creates a new container from the specified image and starts it. You can specify various options when running a container, such as port mappings, environment variables, and more.Create is a command that is used to create a new container from an image, but it does not start the container. When you run the
docker createcommand, Docker creates a new container from the specified image, but it remains stopped. You can later start the container using thedocker startcommand.How to push your image to Docker Hub
First, you need to create a Dockerfile for your application. The Dockerfile contains all the instructions needed to build an image of your application.
Once you have created your Dockerfile, you can build your Docker image by running the
docker buildcommand. For example, if your Dockerfile is in the current directory, you can run the following command:docker build -t your-userme/your-image-name .This command builds an image with the tag
your-username/your-image-nameand uses the current directory as the build context.After the build completes successfully, you can push the image to Docker Hub by running the
docker pushcommand. For example, if you want to push theyour-username/your-image-nameimage, you can run the following command:docker push your-username/your-image-name- Before you can push your image to Docker Hub, you need to log in to your Docker Hub account using the
docker logincommand. For example:
- Before you can push your image to Docker Hub, you need to log in to your Docker Hub account using the
docker login --username=your-username
This command prompts you for your Docker Hub password.
- Once you have logged in, you can push your image to Docker Hub using the
docker pushcommand.
That's it! Your image is now available on Docker Hub for others to use.
Difference between copy and ADD
COPY and ADD are both Dockerfile instructions used to copy files from a source to a destination within a Docker image. However, there are some differences between the two:
- Syntax:
The syntax for COPY is:
COPY
The syntax for ADD is:
ADD
In terms of syntax, ADD is more flexible than COPY. This is because ADD allows you to use URLs as the source, and it also supports the automatic unpacking of compressed files.
- Functionality:
COPY simply copies files from the source to the destination. It does not do any unpacking or manipulation of the files.
ADD, on the other hand, has some additional functionality. It can automatically unpack compressed files, such as tarballs, zip files, and gzip files. It can also download files from URLs.
- Caching:
COPY has better caching than ADD. This means that if you change a file and rebuild your image, Docker will only rebuild the layers that depend on the changed file. This can make the build process faster.
ADD, on the other hand, does not have good caching. This means that if you change a file and rebuild your image, Docker will rebuild all the layers, even if they do not depend on the changed file.
In general, it is recommended to use COPY instead of ADD, unless you need the additional functionality of ADD. This is because COPY has better caching and is simpler to use.
How to check the system log:
To check the logs in Ubuntu, you can follow these simple steps:
Open the terminal on your Ubuntu system.
Type the following command to view the system logs:
sudo less /var/log/syslogThis will display the system logs in the terminal. You can use the arrow keys to scroll through the logs.
To search for a specific keyword in the logs, type the following command:
sudo grep "keyword" /var/log/syslogReplace "keyword" with the keyword you want to search for.
To view the logs of a specific application, type the following command:
sudo less /var/log/application.logReplace "application" with the name of the application whose logs you want to view.
To view the logs in real-time as they are being generated, type the following command:
tail -f /var/log/syslogThis will display the logs in the terminal, and new logs will be added to the display as they are generated.
That's it! These are the basic steps to check the logs in Ubuntu.
How to check logs in real time?
To check logs in real-time, you can use the docker logs command with the -f flag. This will stream the logs in real-time to your console. For example, to view the logs for a container named my_container, you can run the following command:
docker logs -f my_container
This will display the logs in real-time as they are generated by the container. You can use CTRL+C to stop streaming the logs.
Docker-Volume:
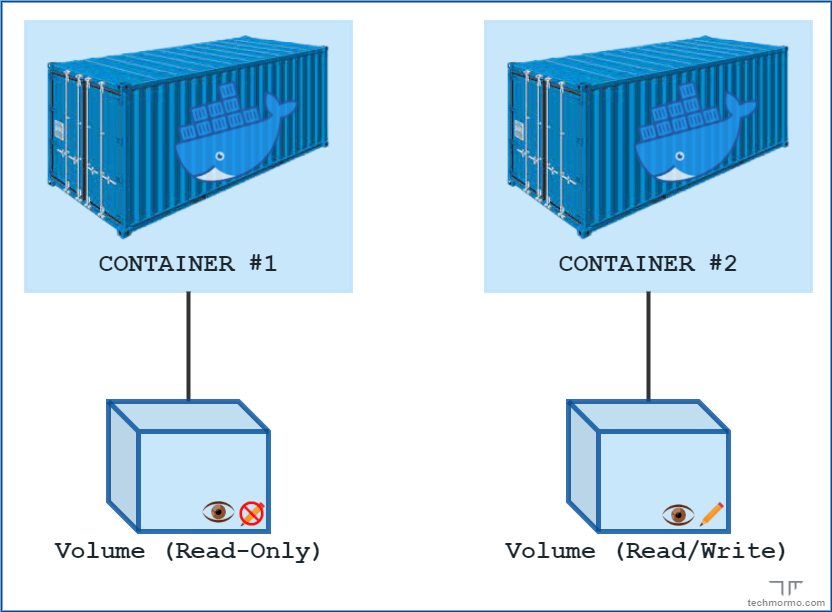
Docker volumes are a way to persist data generated by and used by Docker containers. Essentially, volumes allow containers to access and share data with the host machine, as well as with other containers.
Volumes can be created and managed in several ways, including through the Docker CLI or a Docker Compose file. Here is an example of how to create a volume using the Docker CLI:
docker volume create my_volume
This command creates a new volume called my_volume. Once the volume has been created, it can be used by containers. For example, here is how to start a container and mount the my_volume volume:
docker run -d --name my_container -v my_volume:/data my_image
This command starts a new container called my_container using the my_image image. The -v flag is used to mount the my_volume volume to the /data directory within the container. This means that any data written to the /data directory within the container will be persisted to the my_volume volume on the host machine.
Volumes are a powerful and flexible way to manage data in Docker containers. By using volumes, containers can easily share and persist data, making it easier to manage and scale containerized applications.
Advantages of Volume :
There are several advantages of using Docker volumes:
Data persistence: Docker volumes allow data to be persisted beyond the lifetime of a container. This means that even if a container is deleted or recreated, the data stored in the volume will still be available.
Sharing data between containers: Volumes can be shared between multiple containers, which allows data to be easily shared between different parts of an application.
Improved backup and restore: By storing data in Docker volumes, it becomes easier to back up and restore data. Volumes can be easily backed up and restored using standard backup tools.
Improved portability: By using Docker volumes, an application's data can be easily moved between different environments, such as development, testing, and production.
Improved performance: Docker volumes can be used to store frequently accessed data, which can improve performance by reducing the amount of time it takes to read and write data to disk.
Docker Compose:
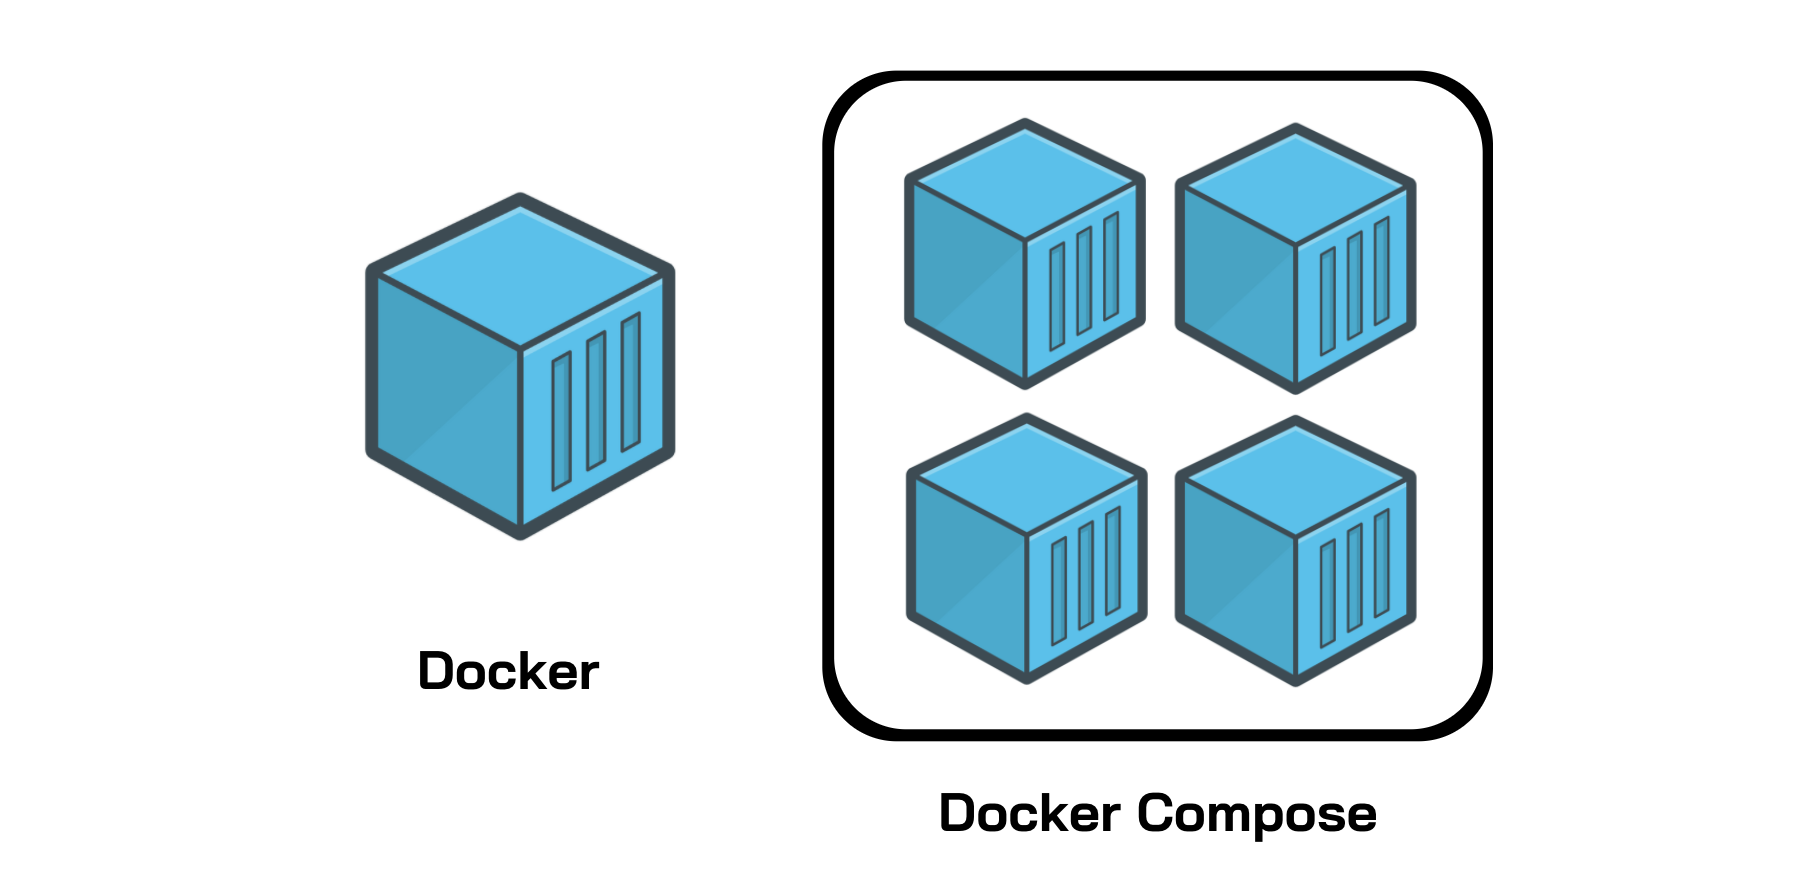
Docker Compose is a tool that allows you to define and run multi-container Docker applications. It allows you to define your application's services, networks, and volumes in a single file, making it easy to manage and deploy your application.
Here's a step-by-step explanation of how to use Docker Compose:
Define your application's services in a
docker-compose.ymlfile. This file should contain a list of services, each with its configuration options such as image, ports, environment variables, and volumes.Run
docker-compose upto start your application. This will create and start all of the containers defined in yourdocker-compose.ymlfile.Use
docker-compose downto stop and remove all of the containers created by your application.Use
docker-compose psto see a list of all of the containers created by your application.Use
docker-compose logsto view the logs of all of the containers created by your application.
Docker Compose is a powerful tool that can simplify the management and deployment of your Docker applications. With just a few simple commands, you can define, create, and manage complex multi-container applications.
How to write a docker-compose file :
here's an example of a simple docker-compose.yml file for a web application:
version: '3'
services:
  web:
    image: nginx
    ports:
      - "80:80"
  db:
    image: postgres
    environment:
      POSTGRES_PASSWORD: example
Advantages of Docker-compose file :
Docker Compose is a tool for defining and running multi-container Docker applications. It allows you to define your application's services, networks, and volumes in a single file, making it easy to manage and deploy your application.
Some advantages of using Docker Compose include:
Simplifies multi-container application deployment: Docker Compose allows you to define your application's services and dependencies in a single file, making it easy to deploy and manage your application.
Easy to use: With Docker Compose, you can define your application's services using a simple YAML file, making it easy to understand and modify.
Scalable: Docker Compose makes it easy to scale your application by adding or removing containers as needed.
What is a Docker Swarm?
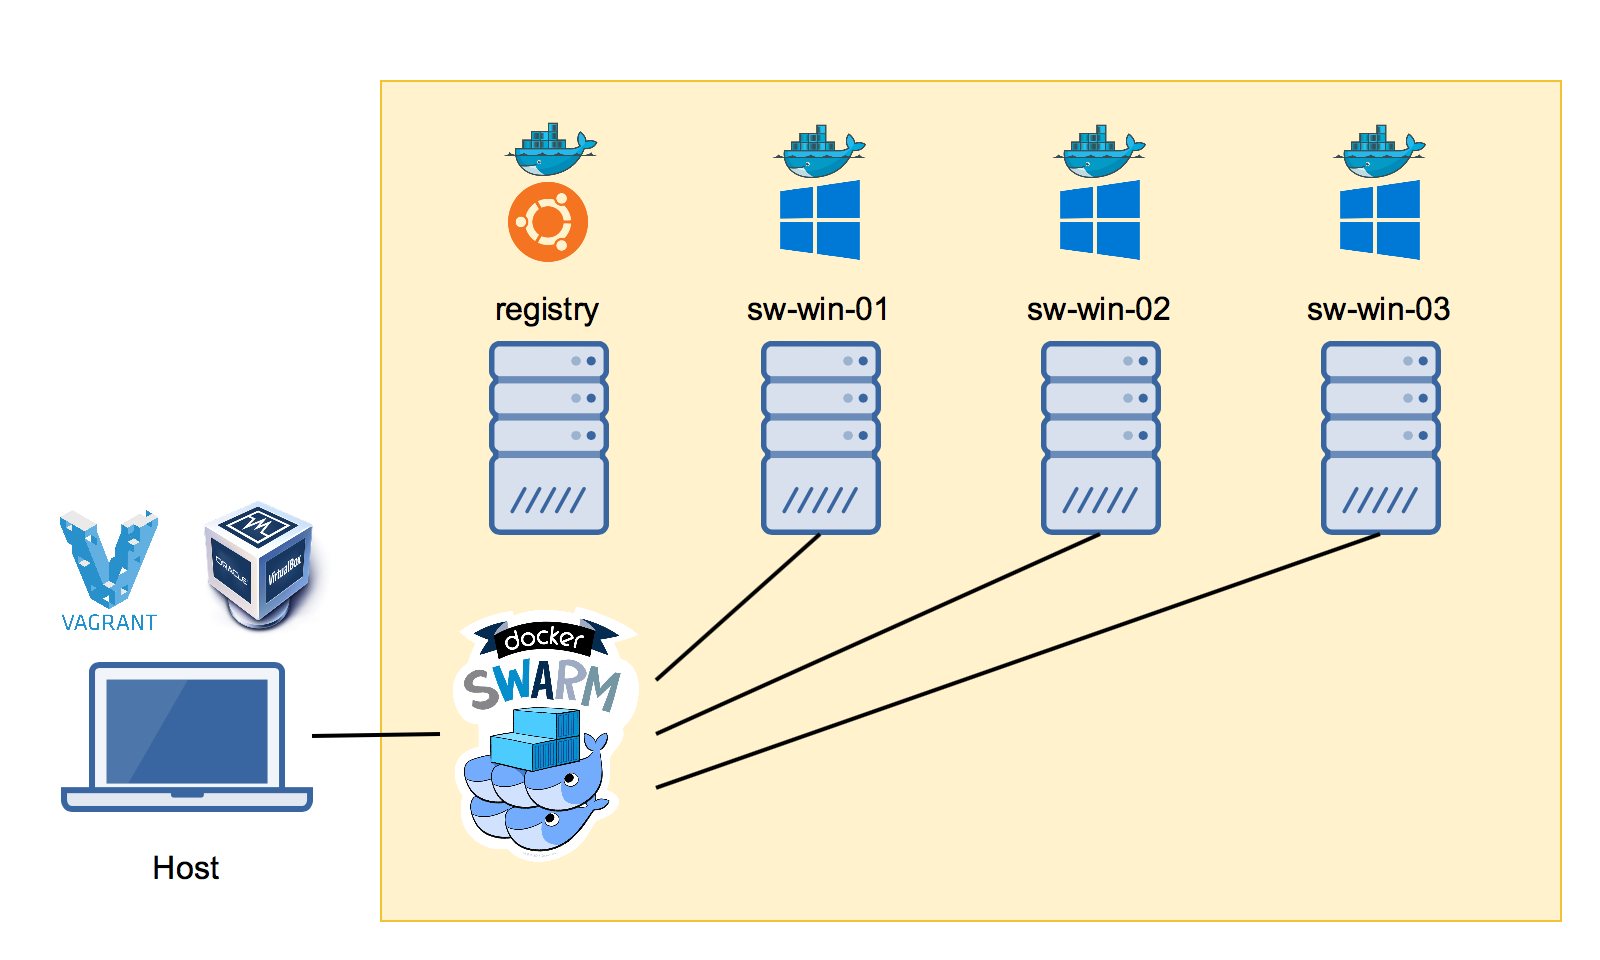
Docker Swarm is a clustering and scheduling tool for Docker containers. It allows developers to create a cluster of Docker nodes, which can be used to run and manage a large number of containers. Docker Swarm provides features such as load balancing, service discovery, and automatic failover, which make it easier to manage a large number of containers running in a cluster. With Docker Swarm, developers can easily scale their applications horizontally by adding more containers to the cluster, which can help to handle increased traffic or workload without affecting the performance of the application.
Here are the steps to set up a Docker Swarm cluster:
Install Docker on all the nodes that will be part of the cluster.
Initialize the Swarm on the manager node using the command
docker swarm init.Join the worker nodes to the Swarm using the command
docker swarm join --token <token> <manager-ip>:<port>.Verify that the nodes have joined the Swarm using the command
docker node ls.Deploy services to the Swarm using the command
docker service create.Scale the services by increasing or decreasing the number of replicas using the command
docker service scale.Monitor the status of the services and nodes in the Swarm using the command
docker service psanddocker node ls.
Advantages :
Here are the advantages of using Docker Swarm:
High availability and fault tolerance: Docker Swarm is designed to be highly available and fault-tolerant. It automatically distributes containers across the cluster, ensuring that there are no single points of failure.
Scalability: Docker Swarm makes it easy to scale up or down the number of containers running in the cluster. This allows you to handle increased traffic or workload without affecting the performance of the application.
Load balancing: Docker Swarm provides built-in load balancing for the containers running in the cluster. This ensures that the traffic is distributed evenly across the containers, improving the performance and availability of the application.
Service discovery: Docker Swarm provides built-in service discovery, which makes it easy for containers to find each other and communicate with each other.
Rolling updates and rollbacks: Docker Swarm allows you to perform rolling updates and rollbacks with zero downtime. This means that you can update or roll back your application without affecting its availability of the application.
Security: Docker Swarm provides built-in security features, such as secure communication between nodes in the cluster and secure storage of secrets.
Docker Networking :
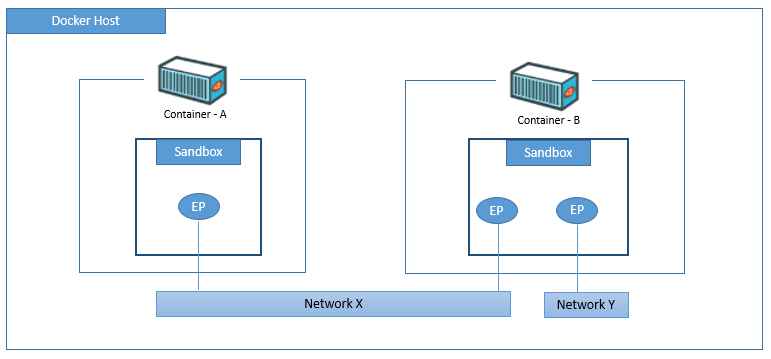
Docker networking is the concept of connecting multiple Docker containers so that they can communicate with each other. Docker provides several networking options to facilitate this.
The default networking mode in Docker is called "bridge" mode, which creates a private network that allows containers to communicate with each other. Each container in the bridge network is assigned a unique IP address and can communicate with other containers on the same network using that IP address.
In addition to bridge mode, Docker also supports several other networking modes, such as host mode, overlay mode, and macvlan mode.
Host mode allows a container to share the network stack of the host machine, while overlay mode allows containers to communicate across multiple hosts. Macvlan mode allows a container to be connected directly to a physical network interface on the host machine.
Docker also provides the ability to create custom networks, which can be used to isolate containers and control their communication. Custom networks allow containers to communicate with each other using their container names, rather than IP addresses.
Overall, Docker networking is a powerful feature that allows developers to create complex distributed applications using containers. By providing multiple networking modes and the ability to create custom networks, Docker makes it easy to connect containers and build scalable, resilient applications.
Advantages of Networking :
here are some advantages of Docker networking explained in easy and understandable language:
Isolation: Docker networking provides network isolation between containers. This means that each container has its own network stack and IP address, which helps prevent conflicts and ensures that containers can communicate with each other without interference.
Scalability: Docker networking makes it easy to scale applications horizontally by adding more containers to a network. This can help handle increased traffic or workload without affecting the performance of the application.
Flexibility: Docker networking provides several options for configuring network settings, including bridge networks, overlay networks, and macvlan networks. This allows developers to choose the best networking option for their specific application needs.
Security: Docker networking provides built-in security features, such as IP address filtering and network segmentation, that help protect against unauthorized access and attacks.
Ease of use: Docker networking is easy to set up and manage, with commands and tools built into the Docker CLI. This makes it easy to create and manage custom networks, attach containers to networks, and troubleshoot network issues.
Overall, Docker networking provides a powerful and flexible way to manage network connections between containers, while also providing security and scalability features that help ensure the reliability and performance of applications.
Hands-on:
here is a step-by-step guide to Docker networking:
Create a custom network:
docker network create my-networkCreate a container and attach it to the custom network:
docker run -d --name container1 --network my-network nginxCreate another container and attach it to the same custom network:
docker run -d --name container2 --network my-network nginxVerify that the two containers are connected to the same network:
docker network inspect my-networkThis command will output a JSON object that includes information about the network, including the two containers that are connected to it.
Test the network connectivity between the two containers:
docker exec -it container1 ping container2This command will start a shell session in container1 and use the
pingcommand to test connectivity to container2.You can also test connectivity from container2 to container1 by running the same command with the container names reversed:
docker exec -it container2 ping container1This should demonstrate that the two containers can communicate with each other over the custom network.
This is just a basic example of Docker networking, but it should give you an idea of how to create custom networks and connect containers to them. From here, you can explore more advanced networking options, such as overlay networks and multi-host networking.
What is multistage DockerFile?
A multistage Dockerfile is a Dockerfile that uses multiple stages or sections to build and optimize a Docker image. Each stage represents a separate phase of the build process and can have its own base image, dependencies, and commands. This approach allows you to build intermediate images and extract only the necessary artefacts for the final production image, resulting in smaller and more efficient Docker images.
The idea behind a multistage Dockerfile is to separate the build environment from the production environment. The build stage is used to compile source code, install dependencies, and perform any other build-related tasks. The artifacts generated in the build stage are then copied into the production stage, where the final image is created with only the necessary files and runtime dependencies.
How to write a multistage DockerFile?
# Stage 1: Build stage
FROM <base-image> as builder

# Set working directory
WORKDIR /app

# Copy source code
COPY . .

# Install dependencies and build the application
RUN <build-commands>

# Stage 2: Production stage
FROM <base-image>

# Set working directory
WORKDIR /app

# Copy built artifacts from the builder stage
COPY --from=builder /app/<path-to-built-artifacts> .

# Set any environment variables
ENV <key>=<value>

# Expose any necessary ports
EXPOSE <port>

# Define the command to run the application
CMD ["<command>"]
Let's go through the different sections and placeholders in the example:
<base-image>: Replace this with the base image you want to use for each stage, such aspython:3.9-alpineornode:14.<build-commands>: These are the commands required to build your application, such as installing dependencies, compiling code, or running build scripts.< path-to-built artifacts>: Specify the path where the build artefacts are located in the build stage. This could be the output directory or specific files needed in the production stage.<key>=<value>: Replace these with the environment variables required by your application.<port>: Specify the port number your application listens on.<command>: Replace this with the command needed to start your application.
By using multistage builds, the final Docker image will only contain the necessary files and dependencies from the builder stage, resulting in a smaller and more efficient image.
Advantages Of Multistage DockerFile:
The advantages of using this multistage Dockerfile are:
Reduced image size: The final production image only includes the compiled artefacts and runtime dependencies, resulting in a smaller image size compared to including the entire build environment.
Improved security: By excluding build-time tools and unnecessary files, the attack surface of the image is minimized, reducing potential security vulnerabilities.
Optimized performance: The smaller image size leads to faster image pulls and deployments. It also reduces the application's startup time as it doesn't need to install unnecessary dependencies during runtime.

