Ansible Tutorial Basic To Advanced

Hi! My name is Safia Khatoon. I am complete my Bachelors in Technology from RTC Institute Of Technology. My specialisation in Computer Science and Engineering.I love contributing to Open Source with the help of the skills I gain.
Also, I'm working on my YouTube Channel as well where I teach about DevOps tools and make technical content. You can have a look at it through my profile.
Feel free to reach out to me! I'd be happy to connect with you.
What is Ansible?
Ansible is a simple, agentless, and powerful automation tool that enables you to automate tasks, manage configurations, deploy applications, and orchestrate complex workflows with ease. It reduces manual effort, promotes consistency, and helps maintain a reliable and efficient IT infrastructure.
Here's a simple real-time example to help illustrate how Ansible works:
Let's say you have a web server infrastructure with multiple servers, and you want to ensure that a specific package (e.g., Nginx) is installed on each server, the configuration files are in the correct state, and the service is running. Instead of logging into each server individually and performing these tasks manually, you can use Ansible to automate the entire process.
Why do we use Ansible?
Ansible is used for various reasons in the field of IT operations and infrastructure management. Here are some key reasons why Ansible is commonly used:
Automation: Ansible allows for the automation of repetitive tasks and workflows, enabling IT teams to save time, increase efficiency, and reduce human error.
Scalability: With Ansible, you can easily manage large-scale infrastructure, from a few servers to thousands, using its agentless architecture and parallel execution capabilities.
Configuration management: Ansible simplifies the management and enforcement of system configurations, ensuring consistency across multiple servers and reducing configuration drift.
Application deployment: Ansible streamlines the deployment of applications, enabling teams to easily and consistently deploy complex applications across different environments.
Infrastructure as Code (IaC): Ansible follows the Infrastructure as Code approach, allowing infrastructure configurations to be written as code, version-controlled, and easily shared, facilitating collaboration and reproducibility.
Advantages of Ansible?
Ansible is easy to learn and use, with a simple and human-readable syntax.
It has an agentless architecture, eliminating the need to install software on managed systems.
Ansible enables the automation of repetitive tasks, saving time and reducing errors.
It simplifies configuration management and ensures consistency across systems.
Ansible promotes collaboration, scalability, and efficiency in IT operations through its extensibility and community support.
Before ansible how do we work?
Before the advent of Ansible, managing infrastructure and performing system administration tasks often involved manual and time-consuming processes. Here's a simplified overview of how things were typically done:
Manual Configuration: System administrators would manually configure individual servers, often logging in remotely via SSH or using remote desktop tools. They would perform tasks such as installing packages, modifying configuration files, and setting up services. This manual process was prone to errors and inconsistencies, especially when dealing with a large number of servers.
Shell Scripts: To automate tasks, administrators would write shell scripts using languages like Bash or PowerShell. These scripts would contain a series of commands and instructions to perform specific tasks across multiple servers. However, managing complex workflows or ensuring idempotent behaviour (i.e., executing the same script multiple times without unintended side effects) was challenging with shell scripting alone.
Configuration Management Tools: To address some of the limitations of shell scripting, configuration management tools like Puppet and Chef were commonly used. These tools allowed administrators to define desired states and configurations using their domain-specific languages. They provided more robust management capabilities, including idempotence, dependency resolution, and support for complex infrastructure setups. However, they often required additional setup and configuration overhead.
Custom Solutions: In some cases, organizations would develop their own custom automation solutions using programming languages such as Python, Ruby, or PowerShell. These solutions were tailored to their specific requirements but required more development effort, maintenance, and specialized knowledge.
Manual Provisioning: When provisioning new servers or virtual machines, administrators would typically go through a manual process involving steps like requesting resources, configuring network settings, and installing the operating system. This process was time-consuming and prone to errors, especially when dealing with a large number of systems.
Overall, the pre-Ansible landscape involved a mix of manual configuration, scripting, and the use of various configuration management tools. While these approaches provided some level of automation and management, they often lacked the simplicity, ease of use, and scalability that Ansible offers today.
What is the difference between ansible, chef and puppet?
Ansible, Chef, and Puppet are three popular configuration management tools that are used to automate IT infrastructure management. Here is a brief comparison of the three tools:
Ansible: Ansible is a simple, agentless automation tool that uses a push mechanism to execute tasks on remote machines. It is easy to learn and requires minimal setup. Ansible uses YAML for its configuration files.
Chef: Chef is an automation platform that uses a pull mechanism to configure and manage servers. It requires a server to be installed and configured before it can be used. Chef uses a domain-specific language called Ruby for its configuration files.
Puppet: Puppet is a mature and powerful configuration management tool that uses a pull mechanism to configure and manage servers. It requires a server to be installed and configured before it can be used. Puppet uses a custom configuration language called Puppet DSL for its configuration files.
What is yml File?
A YAML (YAML Ain't Markup Language) file is a human-readable data serialization format often used for configuration files. It uses indentation and plain text to represent structured data. Here's a simple explanation of YAML concepts with an example:
Key-Value Pairs: YAML uses key-value pairs to represent data. The key is followed by a colon, and the corresponding value is indented. Here's an example of a key-value pair in YAML:
name: dev safiaIn this example, the key is "name," and the value is "dev Safia."
Nested Data Structures: YAML allows the nesting of data structures using indentation. Here's an example with a nested key-value pair:
 person:
   name: dev safia
In this example, the key "person" has a nested key-value pair with the key "name" and the value "dev safia."
Lists: YAML can represent lists or arrays of values. Lists start with a hyphen followed by a space, and each item is indented at the same level. Here's an example:
 fruits:
   - apple
   - banana
   - orange
In this example, "fruits" is the key, and it has a list of three items: "apple," "banana," and "orange."
Comments: YAML supports comments, which are lines starting with the "#" symbol. Comments are ignored by the parser and are used for explanatory or informational purposes. Here's an example:
 # This is a YAML file example
 name: dev safia  # Person's name
In this example, the comment "# This is a YAML file example" provides information about the file, while the comment "Person's name" provides context for the "name" key.
how to define dictionaries:
Here's an example YAML file that demonstrates the definition of dictionaries:
 codeperson:
   name: dev safia
   age: 23
   occupation: Developer
In this example, the key "person" represents the dictionary. The values associated with the "person" key are defined with the indentation. Inside the "person" dictionary, we have three key-value pairs: "name" with the value "dev Safia," "age" with the value 23, and "occupation" with the value "Developer."
You can also nest dictionaries within dictionaries by using further indentation. Here's an example that demonstrates nested dictionaries:
  codeperson:
   name: dev safia
   age: 30
   occupation:
     title: DevOps Engineer
     years_of_experience: 5
In this updated example, the "occupation" key within the "person" dictionary has its nested dictionary. The "occupation" dictionary contains two key-value pairs: "title" with the value "DevOps Engineer" and "years_of_experience" with the value 5.
By using this indentation-based structure, you can define dictionaries and their nested data structures in YAML files.
how to define nested lists :
Suppose we want to define a YAML structure that represents a list of employees, and each employee has a name, age, and a list of skills. The skills themselves are represented as a nested list.
 employees:
   - name: dev safia
     age: 23
     skills:
       - Java
       - Python
       - SQL
   - name: safia khatoon
     age: 21
     skills:
       - JavaScript
       - HTML
       - CSS
In this example:
The key
employeesrepresent a list of employees.Each employee is denoted by a hyphen followed by a space (
-).The employee details, such as name, age, and skills, are indented with spaces to indicate that they are part of the employee's data structure.
The skills of each employee are represented as a nested list under the
skillskey.Each skill is denoted by a hyphen followed by a space (
-) and is indented at the same level as the other employee details.
This structure allows you to represent multiple employees, and each employee can have their own set of skills as a nested list.
Remember to maintain consistent indentation throughout the file for proper parsing.
how to define a nested dictionary :
To define a dictionary within a dictionary (nested dictionary) in a YAML file, you can use proper indentation to represent the nested structure. Here's an example in easy and understandable language:
 codeparent_dict:
   key1: value1
   key2:
     subkey1: subvalue1
     subkey2: subvalue2
   key3: value3
In this example, we have a dictionary named
parent_dictthat contains three key-value pairs:key1with the valuevalue1.key2with a nested dictionary. The nested dictionary contains two key-value pairs:subkey1with the valuesubvalue1andsubkey2with the valuesubvalue2.key3with the valuevalue3.
Note the use of indentation to represent the nesting. The keys within the nested dictionary are indented further to indicate their association with the key2 entry.
You can continue nesting dictionaries within dictionaries as needed, using the same indentation rules.
Keep in mind that YAML is sensitive to whitespace and indentation, so it's essential to maintain consistent spacing and indentation throughout the file for it to be correctly parsed.
YAML files are commonly used for various purposes, including configuration files for applications, defining data structures in code, or as a data interchange format.
Remember that YAML syntax is whitespace-sensitive, so proper indentation is crucial for the file to be parsed correctly.
Difference between Ordered and Unordered Collections:
An ordered collection refers to a collection where the elements have a specific sequence or order. The order of elements is important and is maintained when accessing or iterating over the collection.
On the other hand, an unordered collection refers to a collection where the elements do not have a specific sequence or order. The order of elements is not important, and it may vary when accessing or iterating over the collection.
Here's an example in YAML to illustrate the difference:
Ordered Collection (Array):
    fruits:
      - apple
      - banana
      - orange
In this example, the "fruits" collection is ordered, and the order is significant. The array preserves the order of elements, so when accessing the elements, you would get "apple" as the first element, "banana" as the second, and "orange" as the third.
Unordered Collection (Dictionary):
    person:
      name: dev safia
      age: 22
      city: Delhi
In this example, the "person" collection is unordered. It is represented as a dictionary where the keys ("name," "age," and "city") are associated with their respective values. When accessing the elements, you can retrieve the values by their keys, such as getting the person's name as "dev safia" or the person's age as 22. However, the order in which the keys appear within the dictionary is not significant.
So, an ordered collection maintains a specific sequence or order of elements, while an unordered collection does not rely on any particular order.
Important Points :
Here are some important points and facts about YAML files :
YAML stands for "YAML Ain't Markup Language." It is a human-readable data serialization format that emphasizes simplicity and readability.
YAML uses indentation to define the structure of the data. It uses spaces (typically two or four) to indicate nested levels of data.
YAML files are often used for configuration files in software applications. They provide a flexible and readable way to define settings and options.
YAML supports various data types, including strings, numbers, booleans, lists, dictionaries (key-value pairs), and null values.
Key-value pairs in YAML are written as
key: value, where the key and value are separated by a colon. The value can be a string, number, boolean, or another data structure.YAML allows the nesting of data structures. Indentation is used to indicate the hierarchy and relationships between the data elements.
Lists in YAML are denoted by a hyphen followed by a space (
-). List items are indented at the same level, and each item can be of any data type.YAML supports comments, which are lines starting with the
#symbol. Comments are used for explanatory notes or to provide additional information about the data.YAML files can be easily read and modified by humans, making them suitable for collaboration and version control systems.
YAML is supported by many programming languages through libraries and parsers, making it widely used and accessible.
YAML files can include references and aliases, allowing the reuse of data within the file. This feature promotes modularity and reduces redundancy.
YAML files are often used for defining Kubernetes deployment configurations, Ansible playbooks, CI/CD pipeline definitions, and other similar use cases.
Remember to adhere to the proper YAML syntax rules, such as maintaining consistent indentation and using colons and hyphens appropriately, to ensure the file is correctly parsed.
what is the difference between an array and a dictionary?
here are the key differences between an array and a dictionary:
Array: An array is an ordered collection of elements. It is typically represented by a list of values, where each value has a specific position or index. Arrays are accessed by their index numbers and are useful when the order of elements is important.
Dictionary: A dictionary is an unordered collection of key-value pairs. It is typically represented by a set of keys mapped to their corresponding values. Dictionaries are accessed by their unique keys and are useful when you want to quickly lookup values based on a specific key.
In summary, arrays focus on maintaining the order of elements and accessing them by index, while dictionaries focus on associating values with unique keys for efficient lookup.
Ansible Architecture :
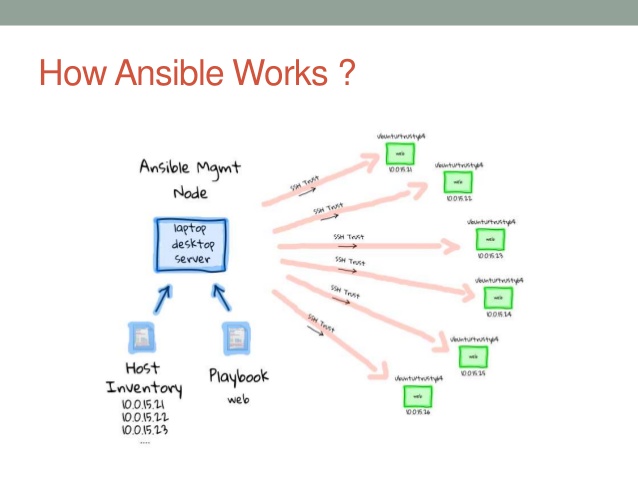
Control Node: The control node is the machine where you run Ansible from. It typically runs Linux, but it can also be a macOS or Windows machine. On the control node, you have Ansible installed, along with the necessary inventory and playbook files.
Inventory: The inventory file is where you define the managed nodes (servers or devices) that Ansible will interact with. It contains information such as the IP addresses or hostnames of the servers. In our example, the inventory file would list the load balancer, application server, and database server.
Playbooks: Playbooks are YAML files that describe the desired state of your systems. They contain a set of tasks that Ansible will execute on the managed nodes. For our web application example, you would create a playbook that defines tasks like installing software packages, configuring services, and copying files to the appropriate servers.
Modules: Modules are Ansible's building blocks. They are pre-written scripts that perform specific actions on the managed nodes. Ansible has a wide range of modules available, covering areas like system administration, network management, and cloud provisioning. Modules can be used in playbooks to carry out tasks such as installing packages, creating users, and managing firewall rules.
Execution: To deploy and configure the web application, you would execute Ansible by running the playbook from the control node. Ansible connects to the managed nodes via SSH or other protocols and performs the tasks defined in the playbook. It communicates with the managed nodes using modules and gathers information about their current state.
Communication: Ansible communicates with the managed nodes using SSH or other remote execution methods. It securely transfers modules and temporary scripts to the managed nodes and executes them to perform the desired actions. The communication is done in a push-based manner, where the control node sends instructions to the managed nodes.
Idempotence: Ansible follows the principle of idempotence, which means that you can run the same playbook multiple times, and the outcome will be the same. If a task has already been executed and the system is in the desired state, Ansible will skip that task during subsequent runs. This ensures that Ansible is safe to use and minimizes unnecessary changes.
By leveraging Ansible's architecture, you can automate various tasks and manage multiple systems efficiently, reducing manual effort and ensuring consistency across your infrastructure.
Ansible inventory: hosts and groups
Ansible inventory is a file or collection of files that describe the hosts and groups you want to manage with Ansible. It helps Ansible identify the systems it needs to work with and allows you to organize your infrastructure into logical groups. Let's go through a step-by-step example to understand how to create an Ansible inventory file.
Step 1: Create an Inventory File Start by creating a file to store your inventory. You can name it whatever you like, but the default filename used by Ansible is inventory. You can create the file using a text editor of your choice.
Step 2: Define Hosts In the inventory file, you need to define the hosts you want Ansible to manage. Each host is represented by its hostname or IP address. You can define hosts in the following format:
[hostname]
hostname_or_ip
For example, let's say you have two hosts, webserver1 and webserver2, with their respective IP addresses:
[webservers]
webserver1
webserver2
Step 3: Group Hosts Ansible allows you to group hosts together based on specific criteria. Grouping hosts makes it easier to manage and apply configurations to multiple hosts simultaneously. To create a group, use square brackets [] followed by the group name, and list the hosts under that group.
[group_name]
host1
host2
For instance, let's create a group called db_servers and add database1 and database2 to it:
[db_servers]
database1
database2
Step 4: Add Host Variables You can assign variables to hosts or groups, which can be used later in your playbooks. To assign variables to a host or group, use the : character after the hostname or group name, followed by the variable assignment.
[hostname]
hostname_or_ip variable=value
For example, let's assign an SSH port variable to our webserver1:
[webservers]
webserver1 ansible_ssh_port=2222
webserver2
Step 5: Add Group Variables Similar to host variables, you can also assign variables to groups. Group variables apply to all hosts within that group. To assign a variable to a group, use the : character after the group name, followed by the variable assignment.
[group_name:vars]
variable=value
Let's assign a common SSH user to all hosts within the webservers group:
[webservers:vars]
ansible_user=ubuntu
Step 6: Use Aliases You can use aliases to refer to groups or hosts by a different name within your playbooks. This can help make your playbooks more readable. To define an alias, use the : character after the alias name, followed by the actual group or host name.
[alias_name:children]
group_name
For example, let's create an alias called production for our webservers group:
[production:children]
webservers
Step 7: Save the Inventory File Save the inventory file after adding all the necessary hosts, groups, and variables.
Ansible playbook structure:
Certainly! Ansible is an open-source automation tool that allows you to define and manage infrastructure as code. Playbooks in Ansible are written in YAML format and define a set of tasks to be executed on remote systems. Here's an example of an Ansible playbook structure :
---
- name: Example Playbook
  hosts: webservers
  become: true
  tasks:
    - name: Install Apache
      apt:
        name: apache2
        state: present

    - name: Copy configuration file
      copy:
        src: /path/to/local/config.conf
        dest: /etc/apache2/config.conf
        owner: root
        group: root
        mode: 0644

    - name: Restart Apache
      service:
        name: apache2
        state: restarted
Let's break down this playbook and explain each section:
name: Specifies the name of the playbook, which helps in identifying it.hosts: Specifies the target hosts or groups on which the playbook tasks will be executed.become: Indicates that the playbook tasks should be run with escalated privileges (usually as root).
Under the tasks section, you define a list of tasks to be performed. Each task consists of several elements:
name: Describes the task in a human-readable format.The module (e.g.,
apt,copy,service) that performs the actual work.Module-specific parameters (e.g.,
name,state,src,dest) that configure the task behaviour.
In the provided example, the playbook performs the following tasks:
Installs the Apache web server on the target hosts using the
aptmodule.Copies a configuration file from the local system to the remote hosts using the
copymodule.Restarts the Apache service on the remote hosts using the
servicemodule.
You can execute this playbook using the ansible-playbook command, specifying the playbook file as an argument.
Ansible Modules and their Usage Part-1
An Ansible module is a reusable script that performs a specific task or action. It is used within Ansible playbooks to automate various operations on target systems. Modules can be written in any programming language and provide a standardized interface for interacting with different systems and services.
Let's take a real-time example to understand this better. Suppose you have a fleet of servers that you need to manage and configure using Ansible. One common task is to ensure that a specific package is installed on all servers.
To achieve this, you can use the Ansible apt module (for Debian-based systems) or the yum module (for Red Hat-based systems) to manage the package installation. Here's an example using the apt module:
- name: Install package
  apt:
    name: <package_name>
    state: present
In the above example, <package_name> should be replaced with the actual name of the package you want to install. When this Ansible task is executed, it will use the apt module to ensure that the specified package is present on all targeted servers.
Here are a few commonly used Ansible modules explained with real-time examples:
apt: This module is used to manage packages on Debian-based systems. It can install, upgrade, or remove packages. For example, to install thenginxpackage, you can use:
- name: Install nginx
  apt:
    name: nginx
    state: present
yum: Similar to theaptmodule, theyummodule is used for package management on Red Hat-based systems. To install thehttpdpackage, you can use:
- name: Install httpd
  yum:
    name: httpd
    state: present
file: This module allows you to manage files and directories. It can create, delete, modify permissions, and set ownership. For instance, to create a directory called/data/logs, you can use:
- name: Create logs directory
  file:
    path: /data/logs
    state: directory
template: This module is used to manage configuration files by rendering templates. It allows you to define variables and dynamically generate configuration files. For example, suppose you have a template file callednginx.conf.j2that contains variables. You can use thetemplatemodule as follows:
- name: Generate nginx.conf
  template:
    src: nginx.conf.j2
    dest: /etc/nginx/nginx.conf
service: This module helps manage services on the target system. It can start, stop, restart, enable, or disable services. For instance, to ensure thenginxservice is started and enabled, you can use:
- name: Ensure nginx service is running
  service:
    name: nginx
    state: started
    enabled: yes
These are just a few examples of Ansible modules and their usage. Ansible provides a wide range of modules for different purposes. You can explore the official Ansible documentation for a complete list of available modules and their detailed usage instructions.
All Modules: https://docs.ansible.com/ansible/2.9/modules/list_of_all_modules.html
why we used the Ansible module
Ansible modules provide a simplified and standardized way to automate tasks in infrastructure management. They offer several benefits:
Abstraction and Simplification: Modules abstract the complexity of interacting with various systems, services, and configurations. They provide a high-level interface that simplifies the automation process. Instead of writing custom code for each task, you can use pre-built modules that encapsulate the necessary logic.
Reusability: Ansible modules are designed to be reusable. Once you create a playbook or role using modules, you can easily reuse them across different projects or environments. This saves time and effort, as you don't have to start from scratch for each automation task.
Idempotency: Ansible modules are idempotent, which means you can run them multiple times without causing unintended changes. The modules check the current state of the system and only apply the necessary changes to achieve the desired state. This ensures consistency and prevents unnecessary configuration modifications.
Standardization: Ansible modules follow a consistent interface and structure. This makes it easier for users to understand and work with them. Once you learn the basic concepts and syntax of Ansible modules, you can apply that knowledge to different modules, reducing the learning curve for new tasks.
Now, let's consider a real-time example to illustrate the usage of Ansible modules:
Suppose you have a fleet of web servers, and you need to ensure that all of them have the latest version of a specific software package installed. Without Ansible, you would have to manually connect to each server, check the version, and update if necessary. This process would be time-consuming and error-prone.
With Ansible and its modules, you can automate this task easily. You can use the apt module (if the servers are Debian-based) or the yum module (if the servers are Red Hat-based) to manage the package installation. Here's an example using the apt module:
- name: Update software package
  apt:
    name: mypackage
    state: latest
In this example, the apt module ensures that the package named mypackage is installed with the latest version on the target systems. Ansible takes care of connecting to each server, checking the current version, and updating it if necessary. This allows you to easily maintain consistency across your server fleet without manual intervention.
By leveraging Ansible modules, you can automate various infrastructure management tasks efficiently, improving productivity, reducing errors, and promoting standardization.
Working with variables and facts:
Working with variables and facts in Ansible allows you to store and manipulate data during your automation tasks. Variables can hold values that can be used throughout your playbook, while facts are pre-set variables that provide information about the managed hosts. Here's an easy-to-understand example of working with variables and facts in Ansible:
Example scenario: You want to deploy a web application on multiple servers, and the application requires different configurations based on the environment (e.g., development, staging, production).
Defining Variables: In Ansible, you can define variables either in your playbook or in separate variable files. Let's define some variables in our playbook:
 ---
 - name: Deploy Web Application
   hosts: webservers
   vars:
     app_name: myapp
     environment: production
In this example, we've defined two variables:
app_nameandenvironment. Theapp_namevariable stores the name of the application, while theenvironmentvariable stores the deployment environment.Using Variables: Once you've defined your variables, you can use them throughout your playbook. For example, you might want to create a directory with the application name:
 - name: Create application directory
   file:
     path: "/opt/{{ app_name }}"
     state: directory
In this task, the
app_namevariable is used to construct the path for the application directory.Gathering Facts: Ansible gathers facts automatically about the managed hosts, providing useful information that can be used in your playbook. For example, you can gather the IP addresses of the servers:
 - name: Gather server facts
   gather_facts: yes
Once the facts are gathered, you can access them using the
ansible_factsvariable. For instance, to display the IP address of a server, you can use:- name: Display server IP address debug: var: ansible_facts['ansible_default_ipv4']['address']In this task, the
ansible_factsvariable is used to access the default IPv4 address of the server.Conditional Tasks: You can also use variables or facts in conditional statements to perform specific tasks based on certain conditions. For example, you might want to install additional packages only in the development environment:
 - name: Install development packages
   package:
     name: "{{ item }}"
     state: present
   loop:
     - package1
     - package2
   when: environment == 'development'
In this task, the
whencondition checks if theenvironmentvariable is set to 'development' before installing the specified packages.
By utilizing variables and facts in your Ansible playbook, you can make your automation flexible and adaptable to different scenarios and environments.
Ansible ad-hoc commands :
Ansible ad-hoc commands allow you to perform quick tasks on remote systems without the need for writing a separate playbook. Here's an explanation of ad-hoc commands in simple language with an example:
Ad-hoc commands in Ansible are one-liners that you can use to execute specific tasks on remote systems. They follow a simple structure: ansible <host-pattern> -m <module> -a "<arguments>". Let's break it down:
ansible: The command to run Ansible ad-hoc tasks.<host-pattern>: The target hosts or groups defined in your Ansible inventory file. For example, you can specify a single host using its name or use a group name to target multiple hosts.-m <module>: Specifies the module to execute the desired action. Ansible provides various modules for different tasks likecommand,shell,copy,apt, etc.-a "<arguments>": Specifies the arguments or parameters to pass to the module.
Now, let's see an example to make it more understandable. Suppose you have a group of web servers defined in your inventory file under the group name webservers, and you want to check the status of the HTTP service on all those servers.
The ad-hoc command to accomplish this would be:
ansible webservers -m shell -a "systemctl status httpd"
In this example:
ansible webservers: Specifies the target hosts (group:webservers).-m shell: Uses theshellmodule to execute the command.-a "systemctl status httpd": Passes the argument"systemctl status httpd"to theshellmodule, which runs the command on remote systems.
When you execute the above ad-hoc command, Ansible will connect to each host in the webservers group and run the systemctl status httpd command, providing you with the real-time status of the HTTP service on each server.
Ad-hoc commands are useful for quick tasks and simple one-liners, but for complex and repeatable configurations, it's recommended to use Ansible playbooks.
Writing and organizing Ansible playbooks
Ansible is an open-source automation tool that allows you to define and manage your infrastructure as code. Playbooks in Ansible are the files where you define the desired state of your systems and the tasks to achieve that state. Writing and organizing Ansible playbooks in an easy-to-understand language is crucial for effective infrastructure management. Here's an example of how to write and organize an Ansible playbook using a real-time scenario:
Let's say you have a scenario where you want to automate the setup of a web server. You need to install Nginx, configure a virtual host, and deploy a sample web application.
Playbook Structure: Begin by creating a new directory for your playbook. Inside the directory, create a file named
web_server.yml. This will be the main playbook file. Now, let's define the structure of our playbook:--- - name: Configure and deploy web server hosts: webservers become: true tasks: - name: Install Nginx apt: name: nginx state: present become: true - name: Configure virtual host template: src: templates/nginx.conf.j2 dest: /etc/nginx/nginx.conf become: true notify: - Restart Nginx - name: Deploy web application copy: src: app/ dest: /var/www/html/ become: true handlers: - name: Restart Nginx service: name: nginx state: restarted become: trueInventory File: Create an inventory file named
hostsin the same directory as the playbook. The inventory file specifies the target hosts where the playbook will be executed. In our case, we assume that the target hosts are defined under the group[webservers]. Here's an example:[webservers] web1 ansible_host=192.168.0.10 web2 ansible_host=192.168.0.11Template File: Create a template file named
nginx.conf.j2in a subdirectory namedtemplates. This template file will be used to generate the Nginx configuration file on the target hosts. Here's an example:user www-data; worker_processes auto; error_log /var/log/nginx/error.log; pid /run/nginx.pid; events { worker_connections 768; # ... } http { # ... server { listen 80 default_server; listen [::]:80 default_server; root /var/www/html; index index.html; server_name _; location / { try_files $uri $uri/ =404; } } }Running the Playbook: To execute the playbook, use the
ansible-playbookcommand followed by the playbook filename and the inventory filename:ansible-playbook -i hosts web_server.ymlTask and module execution in Playbooks
Ansible Playbooks are a powerful tool for automating tasks and orchestrating configuration management. They allow you to define a set of tasks to be executed on target hosts in a declarative manner. Playbooks are written in YAML, which is a human-readable data serialization format.
Let's walk through an example to illustrate how tasks and modules are used in Ansible Playbooks.
Suppose we want to create a playbook to automate the installation of Nginx web server on a group of servers. Here's how the playbook would look like:
 ---
 - name: Install Nginx
   hosts: webservers
   become: true

   tasks:
     - name: Install Nginx
       apt:
         name: nginx
         state: present
In this example, the playbook consists of a single play. The play has a name (
Install Nginx), a list of target hosts (webservers), andbecome: truewhich enables privilege escalation to execute tasks with administrative privileges.The
taskssection contains a list of tasks to be executed on the target hosts. In this case, we have a single task namedInstall Nginx. This task uses theaptmodule, which is responsible for package management on Debian-based systems.Within the
aptmodule, we specify the package name (nginx) and the desired state (present), indicating that we want Nginx to be installed on the target hosts if it is not already present.When we run this playbook using the
ansible-playbookcommand, Ansible will connect to the target hosts specified in the playbook, execute the tasks, and ensure that Nginx is installed on those hosts.To run the playbook, save it as
nginx-installation.yamland execute the following command:ansible-playbook nginx-installation.yamlAnsible Playbooks: Managing files and directories with Ansible
Ansible is a powerful automation tool that allows you to manage and configure systems through the use of playbooks. In this case, we'll focus on managing files and directories with Ansible Let's dive into a real-time example.
Consider a scenario where you have a web server infrastructure and you want to deploy a new website. As part of the deployment process, you need to manage the necessary files and directories on the server. Ansible can help you achieve this efficiently.
Here's an example playbook that demonstrates how to manage files and directories using Ansible:
 ---
 - name: Manage website files and directories
   hosts: web_servers
   become: true

   tasks:
     - name: Create directory for website
       file:
         path: /var/www/my_website
         state: directory
         owner: apache
         group: apache
         mode: 0755

     - name: Copy website files
       copy:
         src: /path/to/local/files/*
         dest: /var/www/my_website/
         owner: apache
         group: apache
         mode: 0644

     - name: Ensure required configuration file exists
       copy:
         src: /path/to/local/config.conf
         dest: /etc/my_website/config.conf
         owner: root
         group: root
         mode: 0644

     - name: Remove unwanted file
       file:
         path: /var/www/my_website/unwanted_file.txt
         state: absent
Let's break down the playbook to understand how it works:
The playbook starts with a name, 'Manage website files and directories', to describe its purpose.
The 'hosts' field specifies the target hosts or inventory group where the tasks should be executed. In this case, we assume you have defined a group called 'web_servers' in your Ansible inventory.
'become: true' enables privilege escalation, allowing the tasks to run with root or sudo permissions.
The playbook consists of multiple tasks, each defined with a name and a module.
The first task, 'Create directory for website', uses the 'file' module to create the '/var/www/my_website' directory with the specified owner, group, and permissions.
The 'Copy website files' task uses the 'copy' module to copy files from the local machine to the '/var/www/my_website/' directory on the remote server. It also sets the owner, group, and permissions for the copied files.
The 'Ensure required configuration file exists' task uses the 'copy' module to copy a configuration file to the '/etc/my_website/config.conf' path on the server. It sets the owner, group, and permissions for the file.
Finally, the 'Remove unwanted file' task uses the 'file' module to delete the '/var/www/my_website/unwanted_file.txt' file if it exists on the server.
By running this playbook against the 'web_servers' inventory group, Ansible will ensure that the necessary files and directories are created, configured correctly, and unnecessary files are removed.
Remember to replace '/path/to/local/' with the actual path of the files on your local machine, and customize the owner, group, and permissions according to your requirements.
Ansible Playbooks: Using conditionals and loops in playbooks
Certainly! Ansible playbooks provide a straightforward and readable way to automate tasks. Using conditionals and loops in playbooks allows you to handle different scenarios and repeat actions efficiently. Let's explore some examples to illustrate their usage.
- Conditionals: Conditionals in Ansible playbooks help you make decisions based on certain criteria. Here's an example where we want to install a package only if it's not already present:
- name: Install package if not already present
  apt:
    name: mypackage
    state: present
  when: ansible_pkg_mgr == "apt" and "'mypackage' not in ansible_facts.packages"
In this playbook snippet, the apt module is used to install a package named mypackage. However, the task will only be executed if the target system's package manager is apt and if the package is not already present. The when keyword defines the conditional statement.
- Loops: Loops in Ansible playbooks allow you to repeat tasks for multiple items. Let's say you want to create multiple users using a loop. Here's how you can achieve that:
- name: Create users
  user:
    name: "{{ item }}"
    state: present
  loop:
    - user1
    - user2
    - user3
In this playbook snippet, the user module is used to create users on the target system. The loop keyword specifies the list of users (user1, user2, user3). The task will be executed once for each item in the loop.
These examples demonstrate how you can utilize conditionals and loops in Ansible playbooks. However, keep in mind that Ansible's flexibility allows for more complex scenarios, including using variables, combining conditionals and loops, and handling dynamic data.
Ansible Roles : Introduction to Ansible roles
Introduction to Ansible Roles: Ansible roles are a way to organize and structure your Ansible code for managing infrastructure. They provide a modular and reusable approach to define and manage tasks, variables, files, and templates. Roles allow you to break down complex infrastructure configurations into smaller, more manageable pieces.
A role consists of several directories and files that define different aspects of the configuration. These directories include tasks, handlers, templates, files, vars, and defaults. Each directory serves a specific purpose and helps organize the role's components.
Real-Time Example: Let's say you have a web application that needs to be deployed on multiple servers. The deployment process involves installing dependencies, configuring the web server, copying files, and starting the application. Instead of writing all the necessary tasks in a single playbook, you can create an Ansible role to encapsulate the deployment logic.
- Create a Role: To create a role, you can use the
ansible-galaxycommand-line tool. Open your terminal and run the following command:
ansible-galaxy init myapp_role
This will create a directory named myapp_role with the necessary structure for the role.
- Define Tasks: Inside the
tasksdirectory of your role, you can define the tasks required for deploying the web application. For example, you can have tasks to install dependencies, copy configuration files, and start the application.
---
- name: Install dependencies
  apt:
    name: "{{ item }}"
    state: present
  with_items:
    - package1
    - package2

- name: Copy configuration files
  copy:
    src: configs/
    dest: /etc/myapp/
    owner: myappuser
    group: myappgroup
    mode: 0644

- name: Start the application
  service:
    name: myapp
    state: started
    enabled: true
Define Variables: You can define variables specific to your role in the
varsdirectory or thedefaultsdirectory. These variables can be used in your tasks and templates. For example, you might define the application port, database connection details, or other configurable parameters.Include the Role in Playbook: To use the role in your playbook, you can include it by specifying the role name under the
rolessection. For example:
---
- name: Deploy myapp
  hosts: web_servers
  become: true
  roles:
    - myapp_role
In this playbook, the myapp_role will be applied to the web_servers group of hosts.
- Run the Playbook: To execute the playbook and apply the role, you can run the following command:
ansible-playbook deploy.yml
This will run the playbook, which includes the role, and perform the deployment tasks on the specified hosts.
By using Ansible roles, you can easily reuse and share your infrastructure configurations across projects. Roles provide a structured and scalable approach to managing complex deployments, making it easier to maintain and collaborate with your team.
Ansible Roles: Role structure and organization
Ansible roles are a way to organize and structure your Ansible code in a modular and reusable manner. They allow you to group related tasks, variables, and files, making your playbooks more manageable and maintainable. Roles provide a higher level of abstraction, allowing you to encapsulate specific functionalities or components of your infrastructure.
A role typically consists of the following directory structure:
roles/
    role_name/
        tasks/
            main.yml
        handlers/
            main.yml
        files/
            ...
        templates/
            ...
        vars/
            main.yml
        defaults/
            main.yml
        meta/
            main.yml
Let's break down each directory and its purpose:
tasks/: This directory contains the main tasks of the role. These tasks define the actions to be performed.handlers/: Handlers are triggered by specific events and are useful for restarting services or taking other actions after the main tasks are completed. The handlers defined here are referenced in the tasks.files/: In this directory, you can place any static files that need to be transferred to the target hosts.templates/: Templates are dynamic files that can be customized based on variables. They are usually written in a templating language like Jinja2.vars/: This directory contains variable files specific to the role. These variables are available to the tasks and templates within the role.defaults/: Default variable values can be defined in this directory. These values can be overridden if necessary.meta/: Themeta/main.ymlfile specifies metadata about the role, such as its dependencies.
Now, let's consider an example to illustrate the usage of Ansible roles. Suppose you have a role called webserver that sets up and configures a web server. The tasks/main.yml file in the role might contain tasks to install the necessary packages, copy configuration files, and start the web server service.
In the handlers/main.yml file, you might define a handler to restart the web server service whenever the configuration files are modified.
The files/ directory could contain static files like SSL certificates or custom error pages that need to be transferred to the server.
Templates in the templates/ directory could include configuration files that require dynamic values like port numbers or domain names. These templates can be rendered using variables defined in the vars/ directory or passed from the playbook.
Variable files in the vars/ directory could define variables like the web server port or the default document root.
The defaults/main.yml file could contain default values for these variables, which can be overridden if needed.
Finally, the meta/main.yml file could specify any role dependencies, such as other roles that need to be applied before this role.
By organizing your Ansible code using roles, you can easily reuse them in different playbooks, share them with others, and manage complex infrastructure configurations more efficiently.
Ansible Roles: Defining role dependencies
In Ansible, roles are a way to organize and structure your automation tasks into reusable units. They provide a framework for breaking down complex configurations into smaller, more manageable components. Defining role dependencies allows you to specify the order in which roles should be executed or applied, ensuring that prerequisites are met before a role is executed.
To better understand role dependencies, let's consider a real-time example of configuring a web server using Ansible. Suppose you have the following roles defined:
common: This role installs common packages and performs basic system configurations required by all servers.apache: This role installs and configures the Apache web server.mysql: This role installs and configures the MySQL database server.wordpress: This role deploys and configures a WordPress application.
In this example, the common role does not have any dependencies on other roles. However, the apache role depends on the common role because it requires the common packages to be installed before it can proceed with the Apache installation. Similarly, the mysql role depends on the common role as well.
The wordpress role has dependencies on both the apache and mysql roles. Before deploying WordPress, it needs to ensure that both the Apache web server and MySQL database server are installed and configured correctly.
To define role dependencies in Ansible, you can use the meta/main.yml file within each role. Here's an example of how the meta/main.yml file for the wordpress role might look:
dependencies:
  - role: apache
  - role: mysql
By specifying the dependencies in this file, Ansible understands the order in which the roles should be applied. When you run your Ansible playbook, Ansible will automatically resolve the dependencies and execute the roles in the correct sequence.
With the defined role dependencies in our example, Ansible will first execute the common role, followed by the apache and mysql roles, and finally the wordpress role.
Defining role dependencies in Ansible helps ensure that the necessary prerequisites are met and simplifies the management of complex automation tasks. It allows you to build modular and reusable configurations, making your playbook more organized and easier to maintain.
Ansible Role: Role variables and defaults
In Ansible, a role is a way to organize and package your automation tasks into reusable units. Role variables and defaults are an important part of roles as they allow you to customize the behaviour of your automation based on specific needs. Here's an explanation of role variables and defaults :
Role Variables: Role variables are placeholders that can be defined within an Ansible role to make it adaptable and configurable. These variables can be used to store values that might change from one environment to another or based on specific requirements. They allow you to separate the logic of your role from the actual data, making it easier to reuse and maintain your automation code.
Real-time Example: Let's consider a scenario where you have an Ansible role that installs and configures a web server. Within this role, you can define variables such as web_server_port, web_server_root, and web_server_user. These variables will be used to determine the port number the web server listens on, the root directory of the web server, and the user that will run the web server process.
By defining these variables as role variables, you can easily customize them based on your specific requirements. For instance, you might want to run the web server on port 8080 instead of the default port 80. In that case, you can simply override the value of web_server_port when you use the role, without modifying the underlying automation code.
Role Defaults: Role defaults are predefined values assigned to role variables. They serve as fallback values that are used when a particular variable is not defined or when an explicit value is not provided when using the role. Defaults help in providing sensible and predictable behaviour out of the box, reducing the need for users to define every variable explicitly.
Real-time Example: Continuing with the web server role example, you can define default values for the variables mentioned earlier. For example, you can set web_server_port to 80, web_server_root to /var/www/html, and web_server_user to www-data. These defaults will be used when users of your role don't override them with their values.
By providing sensible defaults, you make it easier for users to get started with your role without requiring them to define every variable. They can simply use the role as is or override the defaults when needed.
Ansible Roles: Including and using roles in playbooks
In Ansible, roles are a way to organize and package automation tasks. You can include and use roles in playbooks to structure your automation code and make it more modular and reusable. Here's an explanation of including and using roles in playbooks in easy-to-understand language with a real-time example:
Including Roles in Playbooks: To include a role in an Ansible playbook, you use the roles keyword along with the desired role name. This tells Ansible to execute the tasks defined within that role during playbook execution.
Real-time Example: Let's say you have a playbook for setting up a web server, and you want to include a pre-built role called webserver_role that installs and configures the web server software. You can include this role in your playbook by specifying it under the roles section, like this:
- name: Setup Web Server
  hosts: web_servers
  tasks:
    - name: Install and Configure Web Server
      roles:
        - webserver_role
In this example, when you run the playbook, Ansible will execute the tasks defined within the webserver_role role on the hosts specified under the web_servers group.
Using Variables with Roles: Roles often require customization based on specific requirements. Ansible allows you to pass variables to roles, allowing you to configure their behaviour.
Real-time Example: Continuing with the web server role example, let's assume the webserver_role has a variable called web_server_port, which determines the port on which the web server listens. You can pass a value to this variable when including the role in your playbook:
- name: Setup Web Server
  hosts: web_servers
  tasks:
    - name: Install and Configure Web Server
      roles:
        - name: webserver_role
          vars:
            web_server_port: 8080
In this example, the webserver_role role will use the provided value of web_server_port (8080) instead of its default value. This allows you to customize the role's behavior without modifying the underlying code.
Using Tags with Roles: Tags in Ansible allow you to selectively execute specific tasks or roles during playbook execution.
Real-time Example: Let's say your playbook includes multiple roles, and you want to execute only the tasks within the webserver_role role. You can assign a tag to the role and then use that tag to limit the execution:
- name: Setup Web Server
  hosts: web_servers
  tasks:
    - name: Install and Configure Web Server
      roles:
        - name: webserver_role
          tags: webserver
In this example, by using the --tags webserver command-line option when running the playbook, only the tasks within the webserver_role will be executed.
By including and using roles in playbooks, you can organize your automation code into reusable units, customize their behaviour using variables, and selectively execute them using tags. This approach helps in maintaining a modular and scalable automation infrastructure.
Ansible Configuration and Optimization
Ansible configuration file and settings :
Ansible is an open-source automation tool that helps in managing and configuring systems. It uses a declarative language called YAML (YAML Ain't Markup Language) to define the desired state of a system. The Ansible configuration file, also known as ansible.cfg, provides various settings and options to customize Ansible's behavior. Let's explore some key settings in an Ansible configuration file with real-time examples.
Inventory Configuration: The inventory file specifies the hosts or groups of hosts on which Ansible will run tasks. You can configure the path to the inventory file using the
inventorysetting inansible.cfg. For example:[defaults] inventory = /path/to/inventory_fileRemote User: You can set the default remote user for connecting to managed hosts using the
remote_usersetting. For example:[defaults] remote_user = myuserConnection Type: Ansible supports different connection types, such as SSH or local, to connect to managed hosts. The
connectionsetting specifies the default connection type to use. For example:[defaults] connection = sshPlaybook Timeout: Sometimes, you may want to set a maximum runtime limit for a playbook. The
timeoutsetting specifies the number of seconds before a playbook execution is considered failed. For example:[defaults] timeout = 30Roles Path: Ansible roles provide a way to organize and reuse playbooks and associated files. The
roles_pathsetting defines the search path for Ansible roles. For example:[defaults] roles_path = /path/to/roles_directoryVerbosity Level: Ansible provides various levels of verbosity for displaying output. The
verbositysetting controls the amount of output generated during playbook execution. For example:[defaults] verbosity = 2
These are just a few examples of settings that can be configured in ansible.cfg. By modifying this configuration file, you can tailor Ansible to meet your specific requirements and preferences.